Introduction
to WinTIM
J.
Hamblen
School
of ECE
Georgia
Tech
An assembler translates human readable symbolic assembly language programs into binary machine language that can then be loaded into the computers memory. A conventional assembler is developed for a particular machine whose register names, instruction mnemonics and machine instruction formats are completely defined. A meta assembler allows the user to define the instruction formats for any machine. Once instruction formats and opcode mnemonics are defined by the user, the meta assembler then serves as an assembler. A meta assembler is useful for people that are designing a new computer, since they can use it to assemble programs for the new computer without writing a new assembler from scratch. WinTIM is a meta assembler used to convert the symbolic strings of a source program to machine language code and to assign memory addresses to each machine instruction word and data storage location.
Definition Phase: The first step is to define all of the instruction formats and mnemonic names. A source file is written that contains these definitions in a *.def file. The definition file is processed by WinTIM and definition tables are produced for the assembly process. Only one definition file is needed assemble all of the assembly language programs for a given machine.
Assembly Phase: The second step is to assemble the assembly language program for the new instruction formats using the instruction definition tables produced in the definition phase. In this step, the meta assembler functions as a conventional assembler as it converts symbolic assembly language in a *.src file into binary machine language. A conventional style assembly listing is also produced. Just as in a conventional assembler, there can be assembly errors.
An Example Using WinTIM for a simple computer
The first step is to develop the
definition text file, *.def, for the new computer design. Here is an example of the definition file for a
simple computer. An instruction for this computer has 16-bits words that
consist of an 8-bit opcode and address field.
TITLE ASSEMBLY LANGUAGE DEFINITION FILE FOR UP1
COMPUTER DESIGN
WORD 16
WIDTH 72
LINES 50
;**********************************************************************
; UP1 Instruction Format
; ________________________
; | Opcode |
Address |
; | 8-bits |
8-bits |
; |___________|__________|
;**********************************************************************
; INSTRUCTION OPCODE
LABELS - MUST BE 8-BITS, 2 Hex DIGITS
;**********************************************************************
LADD:
EQU H#00
LSTORE: EQU
H#01
LLOAD: EQU
H#02
LJUMP: EQU
H#03
LJNEG: EQU
H#04
LSUB:
EQU H#05
LXOR: EQU
H#06
LOR:
EQU H#07
LAND:
EQU H#08
LJPOS: EQU
H#09
LZERO: EQU
H#0A
LADDI: EQU
H#0B
LSHL:
EQU H#0C
LSHR:
EQU H#0D
LIN:
EQU H#0E
LOUT: EQU
H#0F
LWAIT: EQU
H#10
;**********************************************************************
; DATA PSEUDO OPS
;**********************************************************************
;DB: DEF 8VH#00
;8-BIT DATA DIRECTIVE
DW: DEF 16VH#0000 ;16-BIT DATA DIRECTIVE
;**********************************************************************
;ASSEMBLY LANGUAGE
INSTRUCTIONS
;**********************************************************************
ADD:
DEF LADD,8VH#00
STORE: DEF
LSTORE,8VH#00
LOAD:
DEF LLOAD,8VH#00
JUMP:
DEF LJUMP,8VH#00
JNEG:
DEF LJNEG,8VH#00
SUBT:
DEF LSUB,8VH#00
XOR:
DEF LXOR,8VH#00
OR: DEF LOR,8VH#00
AND:
DEF LAND,8VH#00
JPOS:
DEF LJPOS,8VH#00
ZERO:
DEF LZERO,8VH#00
ADDI: DEF
LADDI,8VH#00
SHL:
DEF LSHL,H#0,4VH#0
SHR:
DEF LSHR,H#0,4VH#0
IN: DEF LIN,8VH#00
OUT:
DEF LOUT,8VH#00
WAIT:
DEF LWAIT,8VH#00
END
Starting with the first few lines of the
definition file above. All characters are normally uppercase. TITLE is a title
string for each page of the listing file. WORD 16 defines the memory word size
for the computer as 16-bits. WIDTH 72 sets the number of characters per line in
the listing file to 72. LINES 50 sets the number of lines per page in the
listing. All text after a “;” in a line is a comment.
The next few lines define the opcode values. LADD is a string that is defined to be EQUivalent to 8-bits of zeros. Since the meta assembler must supply values to fill up fields containing a fixed number of bits, each bit value also has a bit length. H#00 means a two-digit hexadecimal value of all zeros and it would have a bit length of eight since each hex digit requires 4-bits. . In addition to H#, the assembler supports B# for binary, D# for decimal, and Q# for octal bit values. The next few lines starting with Lxxx define the remaining opcode values.
To declare and initialize words of memory for data storage the DW directive is created. DEF means define an instruction or in this case a word of data memory. The “:” is used to distinguish labels from directives like DEF and it is not part of the DW string. Labels typically start in column 1. In the DEF argument 16VH#0000, 16V instructs the assembler to place a 16-bit variable value in memory when the DW string is seen in the assembly source file. The value H#0000 specifies the 16-bit default value of zero. The default value is used if the argument for DW is not provided. Note that the proper number of bits should always be specified to avoid bit length errors during assembly
For each instruction, the mnemonic name and format must be defined using the DEF directive. The line ADD: DEF LADD,8VH#00, instructs the assembler to emit a machine language instruction whenever the ADD string is seen in the source file. The 16-bit machine code has the high 8-bits set to the value of LADD, the add opcode (i.e. H#00) and the low 8-bits are set to the argument of the ADD instruction. The remaining instructions are now defined using additional DEF commands. Since this computer only has a single instruction format, the only difference in these lines is the instruction mnemonic name and the opcode value.
This definition file is then read by the meta assembler and is used to setup tables for the assembly process. It is possible to have syntax errors in the definition file. Any syntax errors must be corrected before the assembly step.
Now the assembly process can begin. Here is an assembly language program source file, *.src, for the computer. This short program is intended only to demonstrate assembler features and it does not compute anything useful.
TITLE EXAMPLE
UP1 COMPUTER ASSEMBLY LANGUAGE TEST PROGRAM
LIST F,W
LINES 50
;*********************************
; MACROS
;*********************************
ECHO: MACRO
PORT
IN PORT
OUT PORT
ENDM
;*********************************
; CONSTANTS
;*********************************
CON1: EQU 2
DISPLAY: EQU H#00
SWITCH: EQU H#01
;*********************************
; PROGRAM AREA
;*********************************
ORG
H#00
START: LOAD
LABEL1%:
ADDI 1%:
SHL 1
SHR CON1%:
AND
H#0F
OR
H#80
SUBT
LABEL2%:
JPOS
ENDP%:
XOR LABEL3%:
ADD (TABLE1 + 3)%:
JNEG
ENDP%:
IN SWITCH
OUT DISPLAY
; MACRO TEST
ECHO H#10
WAIT B#11000011
ENDP: STORE
LABEL1%:
LOOP: JUMP LOOP%:
JUMP START<%:
JUMP $%:
;********************************
; DATA FOR TEST PROGRAM
;********************************
ORG H#80
LABEL1: DW
H#0ACE
LABEL2: DW
H#0000
LABEL3: DW
H#FFFF ;UNSIGNED LARGEST NUMBER
LABEL4: DW
H#7FFF ;TWO'S COMPLEMENT LARGEST
NUMBER
TABLE1: DW
H#0000
DW
H#0011
DW
H#0022
DW
H#0033
DW
H#0044
DW
H#0055
DW H#0066
DW
H#0077
DW H#0088
END
The first three lines setup the listing file titles and options. The next section defines a macro. Macros are like a text editors substitute string command or C’s #define feature. The macro example will be examined later. The next section sets up strings that can be used in place of constants in the assembly language program. The command ORG H#00 sets the origin to zero. This tells the assembler to start placing instructions at memory location zero.
The next several lines contain instructions. The line START: LOAD LABEL1%:, sets up a label, START, that has the value of address of the LOAD instruction. Labels are strings used to mark locations in an assembly language program. Not every instruction needs a label. If you need to branch to an instruction or refer to a data value, a label is typically used. Using the actual address value is a bad practice since any modifications to the program could easily change all of the addresses. The string LOAD is recognized as an instruction from the definition file, so the assembly process emits a LOAD machine instruction with the proper values. LABEL1 is a label that specifies the load address for the instruction. LABEL1 is defined at the start of the next section of code. The”%:” after label instructs the assembler to right justify (“%”) and truncate (“:”) the extra bits of the label value so that it will fit into the 8-bit field in the instruction. A few lines down, note that simple expressions involving labels such as (TABLE1 + 3)%: are also allowed. The line JUMP START<%: generates a PC relative address value. “<” is a special character to indicate PC relative. This means that the address stored in the instruction has the address of the instruction subtracted from the label value. Many computers have PC relative branch instructions since they save address bits. “$” is a special symbol in many assemblers that means the current address.
The final section sets up the variable for the program. An ORG statement is used to keep the data area away from the instruction area. Labels are used to identify variables and the DW directive is used to reserve a word in memory and define an initial value for memory. END is commonly used in assemblers to indicate the end of the source file.
The Macro ECHO is defined in the macro section at the beginning of the program. Macros are used like a substitute string command in a text editor. Macros must be defined before they are called. The macro is expanded into the text string defined between the MACRO and ENDM directive. Don’t forget ENDM or the entire program will become a macro. In the case of this macro, whenever the string ECHO number is encountered in the source file it will be replaced with IN number and OUT number. Number is an argument to the macro. No arguments or multiple arguments separated by commas are also supported. All macros are expanded at the start of the assembly process prior to any other operation. Examine the listing file to see the Macro expansion.
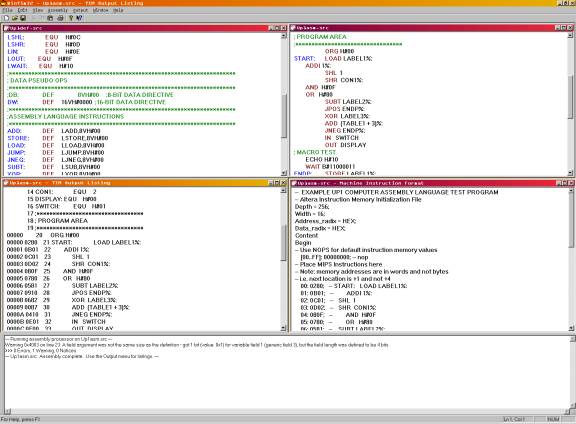
The *.def files and the *.src files can be created using
any text editor. A sample assembly listing file is shown below.
Addr
Line EXAMPLE UP1 COMPUTER ASSEMBLY LANGUAGE TEST PROGRA
1 TITLE
EXAMPLE UP1 COMPUTER ASSEMBLY LANGUAGE TEST PROGRAM
2 LIST F,W
3 LINES 50
4 ;*********************************
5 ; MACROS
6 ;*********************************
7 ECHO:
MACRO PORT
8
IN PORT
9
OUT PORT
10
ENDM
11 ;*********************************
12 ; CONSTANTS
13 ;*********************************
14 CON1:
EQU 2
15 DISPLAY: EQU
H#00
16 SWITCH:
EQU H#01
17 ;*********************************
18 ; PROGRAM AREA
19 ;*********************************
00000 20 ORG H#00
00000 0280 21 START: LOAD LABEL1%:
00001 0B01 22 ADDI 1%:
00002 0C01 23 SHL 1
00003 0D02 24 SHR CON1%:
00004 080F 25 AND
H#0F
00005 0780 26 OR
H#80
00006 0581 27 SUBT LABEL2%:
00007 0910 28 JPOS ENDP%:
00008 0682 29 XOR LABEL3%:
00009 0087 30 ADD (TABLE1 + 3)%:
0000A 0410 31 JNEG ENDP%:
0000B 0E01 32 IN SWITCH
0000C 0F00 33 OUT DISPLAY
34 ; MACRO TEST
35 ECHO H#10
0000D 0E10 35 + IN H#10
0000E 0F10 35 + OUT H#10
35 + ENDM
0000F 10C3 36 WAIT B#11000011
00010 0180 37 ENDP: STORE
LABEL1%:
00011 0311 38 LOOP: JUMP LOOP%:
00012 0300 39 JUMP START%:
00013 0313 40 JUMP $%:
41 ;********************************
42 ; DATA FOR TEST PROGRAM
43 ;********************************
00080 44 ORG H#80
00080 0ACE 45 LABEL1: DW H#0ACE
00081 0000 46 LABEL2: DW H#0000
00082 FFFF 47 LABEL3: DW
H#FFFF ;UNSIGNED LARGEST NUMBER
00083 7FFF 48 LABEL4: DW
H#7FFF ;TWO'S COMPLEMENT LARGEST
NUMBER
00084 0000 49 TABLE1: DW H#0000
00085 0011 50 DW H#0011
00086 0022 51 DW H#0022
00087 0033 52 DW H#0033
00088 0044 53 DW H#0044
00089 0055 54 DW H#0055
0008A 0066 55 DW H#0066
0008B 0077 56 DW H#0077
0008C 0088 57 DW H#0088
58 END
When developing a new definition file the machine codes in the listing should always be verified. On lines that emit memory data, the first column of hex numbers in the listing file is the memory address and the second column is the machine instruction or memory data. Any errors in machine instructions will cause serious time consuming problems later on.
WinTim Assembly Example
Here is an example using WinTim to assemble the program for the simple computer design. Up1def.src is the definition file and Up1asm.src is the assembly language source file. Install and start WinTIM. Open the two source files. Under Assemble, Meta assemble Up1def.src first to process the definition file and then assemble Up1asm.src. Then View the listing or MIF file format to see the assembled code. If you are using the code in the Altera tools, save the MIF file format.
A more complex example using the MIPS computer
For a more complex instruction set consider the MIPS RISC processor. The MIPS has thirty-two registers and 32-bit instructions. In the definition file, it will be necessary to use equates to set up all of the register names and binary values. As an example for R4, the line R4: EQU B#00100 equates the string for register 4 to the five-bit binary value for four. Similar EQU lines will be needed for all of the remaining registers.
Next in the definition file, each of the instructions
would be defined using a DEF command. The MIPS has only three instruction
formats and all instructions are 32-bits. Only I-format LOAD and STORE
instructions reference memory operands. R-format instructions such as ADD, AND,
and OR perform operations only on data in the registers. They require two
register operands, Rs and Rt. The result of the operation is stored in a third
register, Rd. R-format shift and function fields are used as an extended opcode
field. J-format instructions include the jump instructions.
Table 1 MIPS 32-bit Instruction Formats.
|
Field Size |
6-bits |
5-bits |
5-bits |
5-bits |
5-bits |
6-bits |
|
R - Format |
Opcode |
Rs |
Rt |
Rd |
Shift |
Function |
|
I - Format |
Opcode |
Rs |
Rt |
Address/immediate value |
||
|
J - Format |
Opcode |
Branch target address |
||||
R-Format instructions such as ADD could be defined as follows:
ADD: DEF Q#00,5VB#00000,5VB#00000,5VB#00000,B#00000,B#100000
The Add instruction has an opcode of 0, three register arguments that default to R0, a shift field of 0, and a function code of 32. In assembly language, an example add instuction would appear as
ADD R1, R2, R3
The order of the register arguments normally used in the MIPS assembly language Rd,Rs,Rt is not the same as the Rs,Rt,Rd bit order in machine language. If desired, a macro can be used to swap the order of the arguments. Macros must have different names than instructions.
I-format Instructions such as LW could be defined as follows:
LW: DEF Q#43, 5VB#00000,
5VB#00000,16VH#0000
In the native MIPS assembler a typical LW example instruction would be represented as LW R1,Data_Label(R2). The optional parenthesis is used to specify the index register. In a meta assembler it is hard to create special character meanings. A third argument is probably the best solution. In the meta assembler’s assembly language an example LW would be
LW R1,R2,Data_Label%:
In the native MIPS assembler the instruction LW R1,Label specifies R0, which is always the value 0, as the index register. Note that if the argument is not specified in the meta assembler the default value R0 will be used as in
LW R1,,Label%:
Once again the argument order could be swapped using a macro. Here is an example:
LW: MACRO ARG1, ARG2, ARG3
ILW ARG1, ARG3, ARG2
ENDM
Since the macro is now named LW, the instruction definition would need to be renamed as follows:
ILW: DEF Q#43, 5VB#00000,
5VB#00000,16VH#0000
The previous LW instruction example would now become
LW R1,Label%:
Conditional Assembly Directives
Advanced assembly language programmers often use conditional assembly directives. Conditional assembly directives can be used to automatically generate different versions of a program. Complex macros often use conditional assembly directives to generate different code based on their arguments.
In WinTIM, the conditional assembly directive, IF expression ENDIF, is supported. If the expression is true, the following source lines until ENDIF are assembled, otherwise they are skipped. Note that expression must be evaluated at assembly time and not at run time. This means that expression cannot be a function of registers or other program variables that are defined only when the program runs on the computer. Here is an example using both macros and conditional assembly:
FIB: MACRO N
IF N _NE_ 0
ANS: SET ANS + N
FIB N-1
ENDIF
ENDM
The macro calls itself recursively with an argument of N-1 until N
reaches zero. The conditional assembly directive skips the recursive call when
N=0. SET is like EQU, but a symbol can be SET to different values during
assembly. The next two lines initialize the ANS value and call the macro.
ANS: SET 0
FIB 5
After 4 recursive macro calls, ANS is 0+5+4+3+2+1=15 and the macro
exits. A macro could also use the value of a constant argument to select a
different sequence of instructions.
This document has provided a brief overview of the features of
WinTIM. For further information or a more detailed explanation of any
directive, refer to the extensive on-line help files provided with WinTIM.
WinTIM was developed as a class project at Georgia Tech in CmpE 4510 by Eric
Van Heest and Mitch Kispet.